carlynorama

the blog

3D Printing Day 4: Picking a Software, SketchUp

by Carlyn Maw on April 5, 2012, no comments

TL;DR  Just easy. Well, “just easy” after watching about 20-30 minutes of intro videos. Everything I wanted to be able to do, I could. With options comes complexity; I had to spend some time strategizing how to approach building the model since there were so many paths that would have worked. The plethora of YouTube videos helped. I would not plop a 6 year old down in front of Google SketchUp, but a computer user who has some familiarity with graphics packages shouldn’t have a problem. Oh, and it is a real downloaded software with which I can make files that live only my computer. Didn’t even need a login. And it’s free. They get-ya in the free version by making the import and export options incredibly lousy. But another plus is the scripting language, so there is a plugin for that.


A quick search on the internet yields up more information about working with SketchUp than anyone could possibly consume. This is the huge SketchUp advantage – it is on version 8. People have been doing this for a while.


Resources

I watched quite a few other videos trying to glean how advanced users problem solve in SketchUp. I really thought I was going to end up using the FollowMe tool – if only because of its awesome name. As part of that investigation I watched a FollowMe Tool tutorial, How to make a Doughnut Helix, and one about Cuerpos de revolución. (Yes it is in Spanish. Apparently by a guy who used to do a little Parkour. I love the internet.)

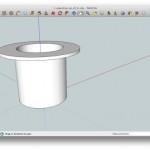
In the end, the Offset tool and the Push/Pull tool  took care of business.

My Video

Since I was able to make the shape so freaking quickly after watching the videos, I decided to make my first screen cast using a built in feature of QuickTime (Took me 25 tires in the end. Think creating a voicemail outgoing message, but 100 times worse.)

The Steps:

  1. Draw circle with a 27.5 radius
  2. Pull it up to 55 mm high
  3. Offset by  2.5 mm
  4. Pull the offset down 52 mm  (measure)
  5. Select the inner bottom edge of the cup with the offset tool, pull it in 22 mm to leave a 6 mm circle
  6. Push the hole down 3mm EXACTLY
  7. Select top outer rim with the Offset tool and pull it out 15mm
  8. Pull both parts of the face up 3 mm
  9. Delete extra circle on the top face
The Model


While google doesn’t force-publish what you do, they do encourage folks to share what they’ve done in the Google 3D Warehouse. A dialog box pops up and asks you if want to share your model the first time you close a file with anything in it. The Google 3D Warehouse is huge. There is some weirdness with my Google 3D Warehouse login – I have two google logins and I can’t seem to get either of them to show carlynorama as the contributor. Oh well, here is the link.


My model of a yogurt Cup SIP – string wick style  on the Google 3D Warehouse


The Run Down


Version 8.0.11751
Date4/3/12


Target Demographic
  • Ideal Object – A building, an chair, a bracelet, whatever.
  • Ideal User – Medium level computer user to expert


Access
  • OpenSource – No
  • Free– Yes
  • Premium Version – Yes ($495.00, includes Layout – a presentation software, “Why Go Pro“)
  • Linux Version – Nothing native, version 8 works with Wine in Windows XP mode (reported on the Ubuntu Forum)
  • Browser Based – No
  • Requires Internet Acces – only to link to 3D Warehouse or get plugins


Privacy, Community & Learning
  • StalkerWare – No
  • Private Files – Yes
  • Official Community Repository – Yes, Google 3D Warehouse
  • Instashare – From the warehouse, Google Buzz/Reader/Blogger/+, Facebook, Twitter, Digg, Delicious, MySpace, and various embed codes. Even for a 3D model version.
  • Collaborative Editing: Yes, via the warehouse
  • Official Tutorials  Great.
  • Community Tutorials – Terrible to Excellent. There are a lot of them.


Editing
  • How many tutorials/videos to build first project – About 30 minutes worth
  • Default Bkg Color – Gray! (But you get to choose)
  • Good for Computer Beginners – Only if they are dedicated
  • Requires 3 Button Mouse – No, but can be helpful
  • Real-world units – Yes, users choice
  • Numeric controls – Yes
  • WYSIWYG– Yes
  • Scripting – Yes Ruby Script
  • Plugins & Extensions – Yes, many


Input
  • Rasters – Free: as flat uneditable things, yes. Pro and plugins might have more tools
  • 2D Vector – No. Pro and plugins might have more tools
  • Other 3D files – Free: DAE, KMZ, 3DS, DEM, DDF  / Pro: Also DWG, DXF (STL via plugin, untried)


Output
  • Direct to STL – Nothing native (Plugin, untried)
  • 2D Rasters: JPEG, TIFF, PNG
  • 2D Vectors: Pro Only PDF, EPS, EPIX
  • 3D Vectors: Free KMZ, DAE / Pro: Also 3DS, DWG, DXF, FBX, OBJ, VRML, XSI
  • Adjust scale on output – No, unitls pre-indicated
  • Direct to Printing Service – No



WordPress Intermezzo – RobinRCutler.com

by Carlyn Maw on November 17, 2011, no comments

Or the answer to  – So Carlyn, what happened to the Drupal Series?

It is still going, but I had an “Wordpress Emergency” to attend to.  My mom has a website. She’s had it for a while but it has been neglected. I built it back in 2007 in WordPress. While WordPress was and is the best choice for this type of site,  it was a real hassle. WordPress has made a number of changes for the better in the past four years. The custom menu feature alone saved me hours and an hours of custom php scripting ( I swear I wrote a function called know_who_the_freakin_ancestor_is_already() )

What brings the big change on now is that she has a lot of material for her new project. Also, it is going to be winter in New York – well it IS winter in New York, and what goes better with a cup of tea and snow outside than blogging?  Also if I didn’t do it NOW… well things fall through the cracks, and she’s a good mom.

I modified the basic Twenty Eleven theme because that is really the one she liked. I was going to use Deilcate, but in the end I think she made a good call. Twenty Eleven is very well documented because it is the default.  NomNom I think, might also be a good choice to make a child theme from in the future maybe, but I couldn’t find it in the WordPress.org theme repository.

I’m not going to go through the whole set up, but there are some key modifications that took me a long time to wrestle with, so hopefully this will save someone else time some day. A couple of them could be full on tutorials, but I’ve got to get back to Drupal!

1. Make a child theme of twenty eleven
2. Turn comments on pages off
3. Change the position of the menu bar relative to the image.
4. Make the header image auto select itself depending on the post category.
5. Change how sticky posts display on Showcase home (move them down to recent posts)
6. Auto Create More Tags for Content going on the Front page. 
7. Put child pages of the Front page at the top of the showcase template

1. Make a child theme of twenty eleven

The first thing I wanted to do is screw with the colors, and I started here – 

The bad things bout this tutorial is only that the CSS it gives doesn’t have the gradients like the parent theme. By searching the style.css file of of 2011 for “#access”  you can copy and paste it’s code into your own css file and tweak the colors there.  Do that second, after you have seen that the orange example works so you know that your color scheme will in fact take.

2. Turn comments on pages off

To my mind, comments are for posts, not pages.  I moved a copy of page.php to my new child-theme directory and changed

<?php comments_template( ”, true ); ?>

to

<?php comments_template( ”, false ); ?>

3. Change the position of the menu bar relative to the image.

I wanted the menu bar ABOVE the image because one of my header images is taller than the others. I think it is better when the menu stays in the same place. I did it purely in CSS. This isn’t ideal because it makes the menu cover the image when the theme is scaled down, but it was taking me a long time to get it to work by changing the flow of the header.php, so I gave up and went with the CSS hack.  If I need to revisit this in the future I’ll take a look at how the NomNom theme puts it’s second bar above the header image. 

4. Make the header image auto select itself depending on the post category.

I didn’t want my mom to have to think about a special image for every post, and yet, as we go I want the images for different categories to be different. I created a directory in my child theme’s home directory called /images/headers and put images with names based on category slugs in there. This is not a good long term solution because it means Mom can ‘t change them herself.  (FTP isn’t her thing… yet) Some day I’ll look into adding a “pick image for category header” to the dashboard, but not this week!

5. Change how sticky posts display on Showcase home (move them down to recent posts area)

First there has to be a static front page and it has to have showcase.php as it’s template. There is a flaw in the directions for this in the Codex, I think. They say to call your new page for the front “Home,” but the is_home() function finds the blog home page and is_front() finds the real front page. Calling a page “Home” other than the one returned by the  is_home() function seems like a recipie for confusion, so I called mine Front instead.

I moved a copy of showcase.php to my child theme, took out all the code that it used for sticky posts and changed the recent posts section to be the following.

6. Auto Create More Tags for Content going on the Front page. 

The problem with the code above is that it dispalys the WHOLE post on the front page, which I don’t like since my mom is writing some pretty long pieces.   I was having a hard time getting the excerpt_length hook to work (resolved, ish) So I went around it and made it so if the post doesn’t have a more tag, I fake it.   I could have just insisted to Mom that she put More tags on all her posts, but she has enough she is trying to learn to remember to do each time to add that step too. 

7. Put child pages of the Front page at the top of the showcase template
Since I nuked the featured-posts section I wanted to adapt the concept of a highlighted area by using the children of the Front page as the content that shows on at the top of front page.

This is not perfected yet, but here is the code for starting off. It took me a tragically long time to trouble shoot this because as soon as I put anything that is a post related variable in my WP_Query it would return nothing. A flaw in WordPress’ behind the scenes is that the code (for good legacy reasons) some times uses the word “post”  (in function/variable names, etc) to mean JUST Posts and sometimes the word “post” is inclusive to mean Posts and Pages. Everything used to be a post, so it makes sense how it ended up that way, but it screwed me up writing the query, copying from examples that were about posts. 

Drupal – Day 6, Part 1: Big List of Modules

by Carlyn Maw on November 7, 2011, one comment

Chapter 4 in dgd7 is all about modules.

The chapter authors start with some general notes about modules

They then follow it with a mega list of modules which is why I am publishing this day in two parts. This post is just the list. I’m going to use this page of links to go exploring.

I’ve created a gist that has a number of the modules I’m interested in listed, ready to drush. Perhaps not the best place in the long run to keep that, but it will do for now

https://gist.github.com/1344036


The Whole List.

Primal


Additional Field Types

WYSIWYG

Webform Creation

Spam

Admin Interface

Content Display

Menus and Navigation

Community Building and Social Networking

Voting and Rating

Paths, Search and 404 Errors

Misc

NodeOne article (Not already listed above & interesting to me)

3 styles article (Not already listed above & interesting to me)

6 revisions article (Not already listed above & interesting to me)

More as they Arrive


    Drupal – Day 5: Wrapping Up Views For Now

    by Carlyn Maw on November 6, 2011, no comments

    So In the end I followed along with all 23 videos from the NodeOne Series on Views. The tl:dr version of what I learned –


    Additional Modules Recommended


    So on top of Devel for making fake content and Admin Menus for delving down with ease, whihc we suggested by NodeOne, the book goes on to suggest looking at the below projects. I only got Views Bulk Operations (already have Calendar)


    • Admin:
      • Views Bulk Operations “This module augments Views by allowing bulk operations to be executed on the displayed rows. It does so by showing a checkbox in front of each node, and adding a select box containing operations that can be applied. Drupal Core or Rules actions can be used.” i.e. “Delete All”
    • Maps:
      • Open Layers “The OpenLayers Module and its submodules bring theOpenLayers JS library into Drupal. They enable users to combine maps from different map providers with data from Views and CCK input. The OpenLayers JavaScript library is open source, making it flexible and capable across standards as well as proprietary APIs.
      • Gmap “The GMap module provides an interface to the Google Maps API within Drupal. It integrates with the Location module to provide users a clickable map for entering latitude and longitude, as well as to display maps of Drupal nodes and users. GMap can be used to create interactive maps with various map markers and content in map bubbles, taking advantage of Drupal’s other content management features. The module also provides a Views display plugin which allows users to display the results of a view on a Google map.
    • Calendars
      • Calendar “This module will display any Views date field in calendar formats, including CCK date fields, node created or updated dates, etc. Switch between year, month, and day views. Back and next navigation is provided for all views.
    • Styles and Displays
      • jCarousel “This module allows developers and themers to make use of the jCarousel jQuery plugin. It includes a developer API that other modules can use, as well as Views integration in the 2.0 version so that you can turn any list of content or images into a carousel.
      • Views Accordion “Views Accordion provides a display style plugin for the Views module. It will take the results and display them as a JQuery accordion, using the first field as the header for the accordion rows.
      • Views Infinite Scroll “Views Infinite Scroll provides a ? that enables views infinite scrolling ( autopaging, depaging, endless pages …you name it) by using jquery.autopager plugin. using this module with views page display will load another page whenever the user reaches bottom of the page.

    Drupal – Day 3: Intro to Views

    by Carlyn Maw on November 3, 2011, no comments

    Last night I finally got the physical copy of dgd7 as it self refers. (I had been working off an eBook)  It is GIANT. Being on Chapter 3 feels way less impressive than it did. But that is a good sign – at the end of chapter 2 I felt like I had accomplished things and understood them in a way that wrestling with Drupal two times before hadn’t made me feel. Perhaps it was easy b/c of the previous exposure, but at the end of Chapter 2 I’ve now:

    Drupal – Day 2: Installing Drush and Git

    by Carlyn Maw on October 31, 2011, no comments

    So while I don’t have time to do something as complete as 30 Drupal features in 30 days,  I will try to at least mention my progress most day so there is a record of things I do that aren’t in the book.  It is good to be following along with a so far well written book. I don’t have to think too hard about what to do next, most things work, and are what I want to know about next anyway.


    Pinwheel Patterns

    by Carlyn Maw on August 22, 2011, no comments

    Simplest Pin Wheel:

    Octagon Pinwheel:

    "Double" pinwheel with enhanced shapeing, bead and wire to mount:

    With center patterns, uses flayed out straw to hold them:

    Very simple, but uses paperclip and whole cut in center to mount into straw.??